Thursday, October 30, 2008

Traditional Stained Glass


Here is a different project I've been working on. This window is part of a much larger window that will go into the Washington National Cathedral. The techniques and materials are the same I use in the entry doors I fabricate at kuhldoors. There are, however, some significant differences. The biggest is the glass. The glass is dark, deep and painted. There is no clear glass it is all colored glass. The glass does come from the same source I get my glass.


This is a close up of one of the pieces. All the dark space is black paint. The artist uses a cross hatching pattern to dampen down the brightness of the glass. This piece was cut, painted by the artist and then fired in a kiln to permanently adhere the paint to the glass. These steps were all done by someone else (my father and the artist). I am only helping my father out by leading, soldering, puttying and cleaning the panels. 


Each painted piece is assembled to make up a larger picture. This is the base of a tree trunk. 


Here is the whole panel. In this window there are 44 panels. 

cool beans.


Tuesday, September 30, 2008

installing glass into door


Many times clients, contractors, architects want to know how the glass is installed in the door. For many of the designs seen on the website the art glass is installed up against the tempered insulation glass facing the inside. Here is how we do it. 


We start with a door I get from one of several suppliers. I get the door with no glass. 

I also get a double pane of tempered insulation glass. This is what provides all the insulation and protection from the outside. This panel is 7/16" thick.


After applying a sealer on the exposed wooden back stop I run a bead of caulk around the edge. This will seal the unit from the outside elements.


I place the double pane of tempered clear glass up against the caulked back stop. 


Then we put the art glass up against the tempered unit. This is facing the inside of the door. The art glass is exposed to the inside of the home or building.


The last step is putting the inside stops up against the art glass to keep everything in place. 

Tuesday, August 5, 2008

New Door Design

Sometimes a client pushes you into a new direction. Two months ago I got a call from a client in California who wanted a door, but not one currently listed on the kuhldoors website. He had seen a door in the gallery but wanted it turned into one panel. We went through the Simpson Doors door selection to pick a door and vala we have a new design.


Not a great picture but you get the idea. Not bad.

Monday, August 4, 2008

Custom Entry Door

Along with providing standard designs shown on my kuhldoors website I do custom orders. These take a great deal more time and effort. 

First step for a custom order is I like to see the space the stained glass windows and doors are going into. This is a new house being constructed in Northern Michigan. At this stage I do not have the job, I am only making a proposal I hope will be accepted. When I design a window it is very important for me to take into account the background. Notice the trees and that there are no other houses or anything else that needs to be blocked out. This is the grand entrance, an important focal point and I do not want to loose the outside view. Rather I would like to see it incorporated into the window. 


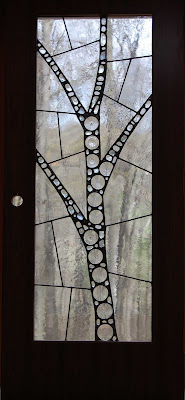
Immediately I thought of a design/pattern I've used in the past, tree branches. I used this door as part of my presentation to the potential client. It is a design for a door I've eager to use on a big project like this one.


I start off with sketches in conjunction with the sample panel shown above.


In case the client does not like the idea of the tree branches I like to give different options. This is another strong design I've used many times successfully. 


Just to cover my bases I incorporated the two designs. Sometimes people like elements of both.


As I had hoped the client loved the tree branches idea. However, they want to explore different options. They also wanted something to reflect birch trees, a prominent tree here in Northern Michigan. So I explore different options. Here we have one dominant tree.


Another option is to offset the dominant tree.


Dominant tree completely off center.


Spending a lot of time looking at Birch trees I find Birch trees usually are seen in groups. Also, I placed them to the left so you can see the actual trees through the window on the right.


Another option is to open up the center.


One dominant tree with two smaller trees on the right.


And why not through everything into the design. Many choices and the winner is.......we'll see.

Friday, July 18, 2008

tools of the trade


If you look through my websites and other posts I talk about working in the traditional method of stained glass. I use lead came and not the copper foil. How traditional is it? And how much has it changed? Well one way is to look at the tools we use today and compare it to what was used over 250 years ago. Above is an illustration from Diderot's Encyclopedie of 1751-72 showing some of the tools used to make leaded glass windows. You can see a glass cutting tool, pliers, hammer, etc.


Here are some of the tools I use to make a leaded glass panel. No real big differences. Making a leaded glass panel means using hand tools. The techniques and  tools have not changed much. 


Another interesting part of the illustration is the detail of the glass they are using. If you can make out  the glass on the shelf, those are rondels or crown bullions. The same type of glass you see in my windows and leaded glass doors.

Saturday, April 19, 2008

soldering


The leaded glass panel shown here is fitted together but not soldered. Soldering is how we bring the 36 pieces of lead came and 29 pieces of cut glass shown here into one leaded glass panel.  I know I'm missing a great opportunity here to come up with an analogy to something bigger but it eludes me.


This is a close up of what the lead came joint looks like before it is soldered. You want the joints to fit as tightly together as possible to get the best solder joint.


These are some of the soldering irons I use. The bigger one is for a heavier gauge lead. The smaller iron is ideal for the type of soldering shown here. The little black box regulates the heat of the iron. If the iron gets too hot it will melt the lead. Solder, a 60/40 mix of tin and lead, melts at a lower temperature than lead. The hotter the iron, the better the solder fuses with the lead. A real master doesn't need a little black box to regulate the heat, he can do it through feel, smell and some zen like 6th sense. I need the black box.


The solder comes in a wire spool. First  take a little bit of solder onto the tip of the iron..


Next  touch the joint with the tip and press down for a beat or two.

Lift the iron and you have a solder joint. A good joint is one where the solder has spread out smoothly and appears to 'melt' into the lead. A poor joint looks like the solder is sitting on top of the lead.


As with everything in leaded glass repeat, repeat, repeat until the whole glass panel is complete. I counted 59 solder joints for one side, so including both sides that's 118 solder joints. Now we just have to putty and clean and the panel is ready to go. This panel is for an entry door, the simple door design from www.kuhldoors.com.

Tuesday, April 15, 2008

cutting glass

Glass cutting. This panel is for a couple in Florida who instead of ordering a whole door with a leaded glass panel just wanted the panel and are ordering the door separately. The door is a craftsman style door. 


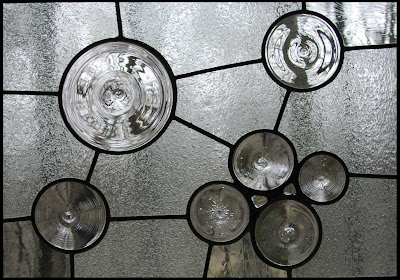
The first step is getting the rondels and laying them out on my template. The rondels dictate the rest of the  design. 


The template gets cut up into patterns which I use to cut the individual glass pieces. Here you see the sheets of glass I use with the patterns laid out on the sheets. The trick is to get as many pieces I can  out of a sheet of glass. 


Here I start cutting the sheet down to smaller pieces. 


The actual cutting. A close up of the glass cutter scoring the glass on the patterns edge. 


If you can make out the line in the glass that is the cut in the glass. Looks like a big scratch  This scratch is what starts the break in the glass. 


Here you see the first cut along the edge of the pattern.

You just keep cutting along the edge of the pattern until you've cut each edge.


Here are all the pieces that came out of that one sheet of glass. These six pieces have 37 edges that are individual cuts. It is a labor intensive process as you can see. Lots of repetition. 


And here are all the pieces that will surround the rondels used in the glass panel.


The final product after it has been leaded and soldered. What a difference the glass looks like from sitting on the bench. Not bad. When the glass sits on the bench you are seeing it with reflected light. Here the glass is shown in transmitted light.

Friday, March 28, 2008

Orange leaded glass door

Every client interaction is unique. Because my leaded glass doors and stained glass windows are custom made, it is not just a simple point, click and ship product. Often times glass samples need to be sent and details nailed down like door sizing and delivery. Once in awhile, though, a client wants to discuss design options. Normally, I am skeptically open to a clients ideas about customizing a design. 

Here was just such an order where the client was very involved in the design. The above photo came from the client, not me, and is a combination of two of my leaded glass door designs, the simple door and the 4 splatter door. Ultimately they went with the left design, 3 orange splatters and two clear rondels. Here is a case where I thought the client did a very nice custom design. The client went with the orange color to match their orange glass tile. I always like to see when the window can tie into the rest of the house.  


From the clients design I ordered the rondels from Kokomo Glass, my excellent rondel supplier in Indiana. I lay them out on a sheet of paper that I will use to create patterns for the rest of the glass. Using a heavy stock, 70# brown paper, I outline the actual size of the window used in the leaded glass door.


I trace the rondels and the reinforcing bars first. The reinforcing bars are the thick lines that go all the way across the panel. Once these are penciled in I draw in the rest of the lead lines. The lead lines outline the individual glass pieces.


I then cut out each piece that will be used ....


... as a pattern ...

to cut the glass.

After all the glass is cut I lay it out on the bench.

Do some leading, soldering, 


puttying,

and cleaning. The cleaning is done with saw dust. Saw dust is great for absorbing all the oils from the flux used in soldering and the putty. After the cleaning all I need is the door and away it goes.